Tuesday, December 28, 2010

ReCap: Get (and Stay!) Organized

A Few Tips to Get—and Stay!—Organized this New Year

1. Choose furniture with lots of storage, and not just one piece on the far end of your home. When you have furniture in every room that can hold various items, chances are your messes will disappear (at least behind closed drawers and doors!). For instance, opt for a small bureau with drawers or shelves by your front door in place of an entry table.

2. Baskets, baskets, baskets! These catch-alls look great and help contain often-used and seldom put-away items.


3. If you’ve got a million things to keep straight, a day planner is a must. Call me old fashioned, but nothing keeps me organized like a physical planner. Indulge in a cute one that you’ll actually use! (Ask about our custom ones at Petite Surprise - so stinkin' cute!!)


4. Are you always losing your keys? Mount a stylish brass key catcher by the door you use most. You’ll always know where you left them, but better yet, it keeps the family’s keys off counters and tables!

5. Get a filing cabinet (or a small scanner). Let’s face it, there are documents you must keep on hand, and my how quickly they add up! Without a plan for these mounds of paper, they soon overtake your home. Get an actual filing cabinet (and no, not all of them are ugly) if you plan to keep hardcopies. If not, opt for a small scanner to store documents electronically, just be sure to back up frequently. Commit to a schedule that you can handle. Maybe you won’t file everything immediately after you receive it in the mail—that’s ok. Collect a pile (in a drawer, basket or some other organized manner) and file everything weekly or monthly.


6. Cut down on clutter. When shopping, ask yourself whether you really need this item. If you don’t monitor your purchases, odds are you’ll be hauling it to the local thrift store before the end of next year.


Here’s to an organized New Year!

Tuesday, December 21, 2010

ReCap: Handmade Holiday


For those of you who missed the column in The Stuart News this week, here's a little handmade holiday how-to:

CHRISMAS CARD GARLAND

One great thing about this time of year is correspondence from old friends. Unless you have a bulletin board or lots of room on the fridge, here’s a simple way to display your family and friend’s beautiful Christmas cards.

1. Decide where you will hang your Christmas Card Garland—perhaps over a window, china cabinet or mantle. Cut a piece of ribbon, string or twine accordingly.

2. Affix 14 clothespins to the string.

3. Make “letters” from stickers and paper to spell M-E-R-R-Y C-H-R-I-S-T-M-A-S. Shiny silver stickers on 2” x 2” squares of red or green paper are pretty, but be as creative as you want. For the brave, try shiny tin foil wrapped around letters cut from a thin cardboard.

4. Use one clothespin per letter to attach “Merry Christmas” to the string.

5. As Christmas cards are delivered, place the cards behind the letters and attach with the clothespin. Don’t be afraid to double up if you receive more than 14 cards— the more, the merry-er!


SOCK ADVENT CALENDAR

I’m not sure where it originated, but I came across this advent calendar via Martha Stewart. This would make a great gift for an expectant mother – or any mother for that matter!

1. Again, decide where you are going to hang your Advent Calendar, and cut a piece of rope or thick twine to the desired length. Plan on using 5’ or more to give you room on the ends.

2. Gather 24 children’s socks in coordinating Christmas colors. Look for stripes, plaids and polka dots in varying sizes and shapes.

3. Lay socks out in the order you would like them to hang, mixing up the patterns and sizes.

4. Affix each sock with a number – stickers work great. If you don’t have enough to do this time of year, embroider numbers onto each sock.

5. Use clothespins to attach each sock to the rope in number order.

6. Place a (petite!) surprise in each sock, and allow children to “open” one sock each day of December leading up to Christmas!

Although I'm not going to make the advent calendar for this year, I've started to collect children's Christmas socks that are now on sale to prepare for next year!
Enjoy!

Monday, December 13, 2010

Master{ing the}Bath ~ Phase 2, The Hunt


Back on November 3rd, I posted some inspiration photos for our master bathroom remodel. I’d like to announce that we are officially in Stage 2: we made our first purchase!

Oh and what a steal it was – 100 square feet of (might I add, gorgeous!) honed marble for less than $100! Some installer cleaned out his storage unit, and I happened upon it, making for a very happy day. :)

Anything would be an upgrade when compared with our yellow linoleum that wishes it was terrazzo…

As happy as I was about the price, it was great to have one thing…solidified (for lack of a better word). For so long I was back and forth between styles and stones and floorplans and vanities and...it is nice to have something purchased (that can’t be returned!) to base the other elements around.

We have finally decided on a floor plan, which means I have measurements for our vanity and corner storage piece. I’d like to use a piece of furniture for the vanity with this feel:

You’d think that being in the furniture business, I’d be able to find something – you know, the cream of the crop. Nope. I’ve been looking for about 6 months and nada. So lovies, I hate to leave you hanging, but it’s my day off from the shop and I’m out to hunt!

Don’t worry, I’m looking for new fun stuff for the shop too. Be sure to stop in to see what I find. :)

Friday, December 10, 2010

white + raw

You know how you can quickly waste hours by clicking from person to person and photo to photo on Facebook? Yah, well I don't really have that problem, but I DO often spend a little longer than I'd like popping from design blog to design blog. Before you know it, an hour is gone! At least I can justify it as "working". :)

Well, I found many fun things, but you'll just have to wait until I have a little longer for those. BUT, I will give you this:


This one photo describes all that I'm loving right now - white walls with raw woods mixed with a dose of personality.

The architecture is so fun. That huuuuge fireplace. The little balcony up top. Raw wood ceilings. The mantle and chimney...

I think my favorite thing about this room is its....quirky-ness (for lack of a better word!). Like that little sconce on the left side. So tiny on such a big wall, and in a rather random location - but it works! And how about the firewood up on the shelf?

I would looove to see the rest of the home. Bummer...


Monday, December 6, 2010

ReCap: Mantle Madness

On (most!) Mondays, I plan to repost my column that was printed in the Sunday paper the day before. Be sure to look here for additional photos!

Whatever your style may be, I hope the following images give you a bit of inspiration as you decorate your home for Christmas:

STYLE: French Provincial

- Elements: Rusts and golds look great in a French Provincial home. Try symmetry with little clutter, keeping in mind that fruits, busts and statues, mirrors, candles and clocks make great mantle accessories.

- Must Have: With the mantle relatively bare, live garland adds that festive touch –Eucalyptus or Magnolia work well.

- Stockings: My personal favorites are created from antique grain sacks, but a luxurious velvet would be nice as well.

- Where to Shop: Arhaus, Pottery Barn, European antique shops, EloquenceInc.com

STYLE: Coastal Cottage

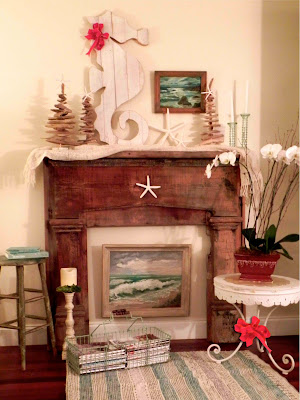
- Elements: Begin with driftwood, starfish and white flowers. Add pops of traditional Christmas red or green for holiday flair. Experiment and see what color combinations would work best in your home.

- Must Have: A driftwood forest from Petite Surprise – I know I’m a little biased, but these driftwood trees are adorning my coastal mantle this year!

- Stockings: I’m really loving the recycled sweater stockings (customized in your home’s color scheme!) from Handmade Pretties which can be found on Etsy.com.

- Where to Shop: April Daze, Gumbo Limbo, Petite Surprise, the beach


STYLE: Vintage-Bohemian

- Elements: Bright colors, organized clutter, vintage finds and a random mix of accessories pulls off this look. It helps to have a bold backdrop, but even white walls can be transformed into a vintage haven.

- Must Have: Multi-colored tree trimming lights in the larger bulbs. If you can find vintage ones, even better – just be sure to check the wires!

- Stockings: The hand-knit sherpa stocking from Anthropolgie is a great option for new, or hunt at second hand shops for something vintage.

- Where to Shop: Anthropologie, Petite Surprise, Etsy.com, second hand shops

STYLE: Rustic Woodsy

- Elements: Raw woods and little color are the foundation of this look. Add rusted metals with recycled or repurposed architectural pieces. Throw a bit of greenery in, and you’re mantle is complete.

- Must Have: Unfinished wood is key. Whether it’s the mantle, candlesticks, picture frames or architectural finds, the more the better!

- Stockings: Hand-knit stockings are hard to beat. Creams, reds, greens –you pick!

- Favorite Shops: Restoration Hardware, architectural salvage yards, the great outdoors

By now, I know many of you are wondering what to do if you don’t have a mantle to decorate. Unfortunately, our older Florida home puts us in the same boat. Know that you can always decorate what you have - pick a room you use often and adorn the focal point of that room. Is it a buffet in the dining room, a large bookshelf in your living area, an armoire in the bedroom? You can still incorporate many of the same ideas with any piece of furniture.

Your other option is to create a faux fireplace. My husband and I purchased an old pine mantle and simply leaned it against the wall (as seen in several of the above photos). Add a cluster of candles in the opening, and you’ve got the same effect – only your “fire” can be kindled in 5 seconds!

I’d love to see what you create in your own home– send photos to info@petitesurprise.com to be posted here on my blog. Share your inspiration. Happy decorating!